
Desserts
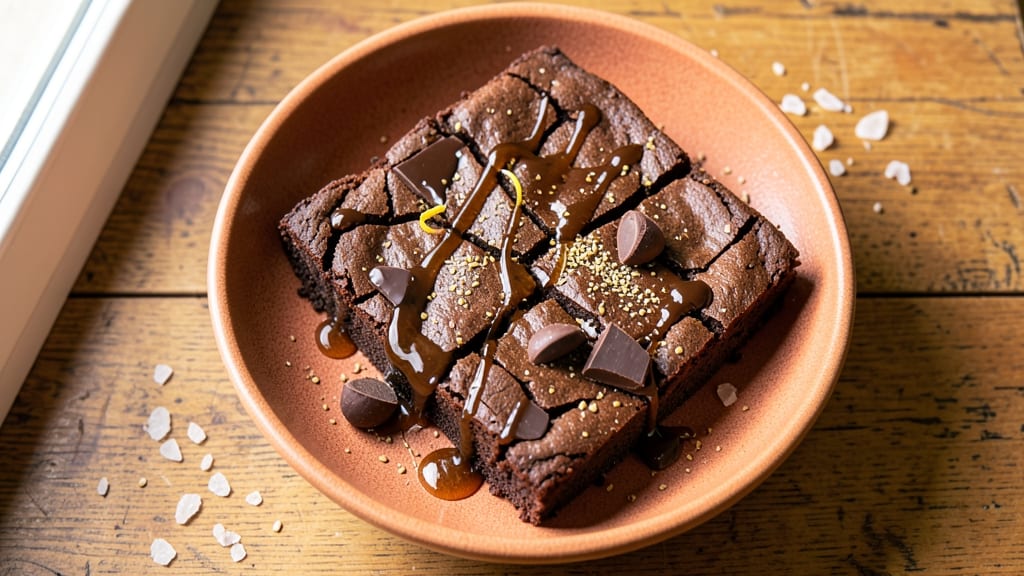
This chickpea chocolate brownie recipe delivers all the rich, fudgy satisfaction of classic brownies—with a secret protein boost you won’t taste but will appreciate. The magic happens when chickpea flour replaces traditional flour, creating a dense, moist texture that holds up perfectly while adding plant-based nutrition. What makes these brownies special is their balanced sweetness and deep cocoa flavor, achieved through careful ingredient ratios and a swirl of dairy-free chocolate that keeps every bite decadent.
The recipe uses flax eggs and coconut oil for binding and richness, ensuring they stay tender without compromising structure. Unlike many vegan brownies that can taste overly grainy or dry, these develop a fudgy, crackly-topped texture that’s impossible to resist.
The protein boost comes from chickpea flour, which also adds a subtle nutty depth that complements the chocolate beautifully. This is the kind of dessert that satisfies cravings while keeping dietary goals on track.
By the time they emerge from the oven, you’ll have brownies with a glossy, crackly top and a moist, dense interior that melts in your mouth. The swirls of dairy-free chocolate create pockets of extra richness, while the edges stay just firm enough to hold a fork.
Serve warm with a scoop of vegan ice cream or enjoy at room temperature for a treat that feels indulgent yet guilt-free. The best part? They’re foolproof and ready in under an hour.
Perfect for sharing with friends who don’t know (or care) they’re eating a protein-packed dessert, or for satisfying your own cravings without compromise. The recipe scales easily, so you can bake a single pan for personal indulgence or double it for gatherings.
Let’s get baking—your taste buds (and muscles) will thank you.
Ingredients for chickpea chocolate brownie
Protein-packed, fudgy, and secretly healthy—these ingredients make magic happen.
| Ingredient | Amount | Notes |
|---|---|---|
| Chickpea Flour 🌾 | 1 ½ cups | Protein-rich, nutty depth |
| Dairy-Free Dark Chocolate Chips 🍫 | 1 ½ cups | Enjoy Life brand preferred |
| Coconut Oil 🫒 | ¾ cup | Melted, full-fat preferred |
| Maple Syrup 🍯 | 1 cup | Pure, grade B preferred |
| Vanilla Extract 🌿 | 1 tbsp | Pure, alcohol-free |
| Ground Flaxseed 🌾 | ½ cup | Freshly ground for flax eggs |
| Almond Milk 🥛 | ¼ cup | Unsweetened, vanilla flavor |
| Unsweetened Cocoa Powder 🍫 | ½ cup | Dutch-processed preferred |
| Baking Powder 🧂 | 1 tsp | Aluminum-free preferred |
| Salt 🧂 | ½ tsp | Fine sea salt |
| Dairy-Free Chocolate Bars 🍫 | 8 oz | For swirls, chopped |
| Dark Chocolate Chips 🍫 | ½ cup | Extra for topping |
Chickpea flour is the secret weapon here. Bob's Red Mill or Anthony's Goods are my go-tos for quality, but any organic brand works. The flour gives these brownies their dense texture while adding a subtle nutty flavor that pairs perfectly with chocolate. For the chocolate chips, Enjoy Life brand is a must—it's dairy-free, gluten-free, and melts beautifully. If you can't find Enjoy Life, Pascha or Hu Kitchen are solid backups. The cocoa powder is where you can splurge: Valrhona or Guittard make a noticeable difference in richness. Freshly ground flaxseed is key for the flax eggs—if you don't have a grinder, Bob's Red Mill pre-ground works in a pinch.
No chickpea flour? Substitute with 1.5 cups all-purpose flour plus 0.5 cup vital wheat gluten—it'll give you that chewy texture. Swapping the dark chocolate? Use 70% or higher cacao content for that deep flavor. Running low on almond milk? Oat or soy milk work just as well. The dairy-free chocolate bars for swirls can be any brand, but chocolate with nuts or sea salt adds extra dimension. For the topping chips, if you're feeling fancy, mix in some crushed nuts or flaky sea salt before baking. And trust me, the vanilla extract matters—alcohol-free versions have more concentrated flavor.
Store these brownies in an airtight container at room temperature for up to 5 days, though they'll likely disappear faster. For longer storage, wrap tightly in plastic wrap and freeze for up to 3 months. The texture stays perfect when reheated—just pop them in the oven at 300°F for 5-10 minutes. I always bake an extra batch because they're perfect for gifting (people won't believe they're vegan). These reheat beautifully too—microwave 20 seconds for a quick treat. The crackly top is best when served slightly warm, but they're delicious at room temperature too.
Why You'll Love This Recipe
- I’ll be real: this recipe saved me during a grocery budget crunch. Chickpea flour, coconut oil, and dark chocolate? Stuff I already had. No specialty ingredients, no last-minute store runs—just pull what you’ve got and bake. And the leftovers? They last forever without drying out.
- No Mixer Needed: I swear by this recipe because it’s unfussy—just whisk chickpea flour, melted coconut oil, and maple syrup until smooth. No eggs, no waiting for butter to soften, no extra bowls. Honestly, I’ve made it in my mug when I forgot to take the pan out of the dishwasher.
- Fudgy Without Guilt: That rich, dense texture? All thanks to the chickpea flour and dark chocolate chips melting into a gooey center. The maple syrup adds just enough caramel depth, while the vanilla ties it all together—like a dessert that actually feels indulgent, even when it’s vegan.
- Double-Duty Dessert: Between us, these brownies are my go-to for breakfast (yes, really) or a quick after-school snack. Pack them in lunchboxes, freeze half for later, or bring a batch to a potluck—no one will guess they’re secretly healthy. My kids call them “magic cookies,” and I’m not correcting them.
Step-by-step instructions for chickpea chocolate brownies
Here's how to create rich, protein-packed brownies with decadent chocolate swirls.
Prepare the Flax Eggs and Melt the Chocolate
In a small bowl, whisk together the 0.5 cup ground flaxseed and 0.25 cup almond milk. Let this mixture sit for 10 minutes while you work on the rest of the recipe—this creates flax eggs that bind everything together. You'll know it's ready when it thickens to a gel-like consistency, similar to raw egg whites.
While the flax eggs thicken, melt the 8 oz dairy-free chocolate bars and 1.5 cups dairy-free dark chocolate chips together in a heatproof bowl set over a pot of simmering water. Stir until completely smooth, then remove from heat. This melted chocolate will form the rich base for your brownies. Let it cool slightly—it should be warm but not hot when you add it to the batter.
Combine Wet and Dry Ingredients
In a large mixing bowl, combine the melted chocolate with the 1 cup maple syrup, 1 tbsp vanilla extract, and the thickened flax egg mixture. Stir until everything is fully incorporated and the mixture is smooth. The batter will be thick but pourable—this is perfect for creating that signature fudgy texture.
In a separate bowl, whisk together the 1.5 cups chickpea flour, 0.5 cup unsweetened cocoa powder, 1 tsp baking powder, and 0.5 tsp salt. Sift the dry ingredients if possible to avoid lumps—this ensures even distribution throughout the batter. Gradually add the dry mixture to the wet ingredients while stirring gently with a spatula. Mix just until combined—overmixing can make the brownies dense instead of fudgy.
Create the Chocolate Swirl
Pour half of the batter into a 9x13-inch baking dish that's been lined with parchment paper. Sprinkle half of the 0.5 cup dark chocolate chips evenly over the batter. Using a rubber spatula, gently swirl the chocolate chips into the batter in a circular motion—this creates those beautiful marbled patterns throughout the brownies.
Top with the remaining batter, then sprinkle the remaining chocolate chips evenly over the top. Gently press down on the top layer with the spatula to help the chips sink slightly into the batter. This layering technique ensures every bite has both rich chocolate and fudgy brownie elements.
Bake to Perfect Fudgy Perfection
Preheat your oven to 350°F and let it fully preheat for 10 minutes—this ensures even baking. Place the baking dish on the center rack and bake for 25-30 minutes. The brownies are done when the edges are set but the center still looks slightly underbaked—it should spring back slowly when gently pressed with a finger.
I like to check for doneness at the 25-minute mark—if the center still jiggles slightly, that's perfect. Overbaking makes brownies dry, while slightly underbaked centers create that signature fudgy texture. Let the brownies cool in the pan for 15 minutes before slicing—this helps them set properly and makes them easier to cut into clean squares.
Cool and Enjoy
Transfer the brownies to a wire rack and let them cool completely before slicing into 12 equal squares. The cooling process allows the flavors to meld and the texture to set properly. For the best experience, serve at room temperature—this lets all the chocolate flavors develop fully.
These brownies keep well at room temperature for 3-4 days in an airtight container, though they rarely last that long. Store any leftovers in the refrigerator for up to 5 days—the protein boost from the chickpea flour actually helps them stay fresh longer than traditional brownies.
Pro Tips For Making Chickpea Chocolate Brownie
- Preheat Pan First: Slap that 8x8-inch baking dish in the oven with the broiler on for 3-5 minutes before adding the batter. Chickpea flour browns faster than regular flour, and this step guarantees crispy edges—no more soggy corners when you pull them out.
- Melt Coconut Oil Slow: Warm the coconut oil in a bowl over simmering water (double boiler) until just liquid—no higher than 100°F. Overheating turns it greasy, and you’ll end up with dense brownies instead of fudgy ones. Test with a spoon: it should coat smoothly but not feel hot.
- Fold Chips Gently: Reserve ¼ cup chocolate chips to fold in last, right before baking. Dumping them all in at once leads to clumps, and you’ll lose that melt-in-your-mouth texture. Use a spatula to swirl them through—like stirring cold butter into cookie dough.
- Bake Until Slightly Under: Pull the brownies when the edges are set but the center still jiggles like Jell-O. Chickpea flour makes them firm up fast after baking—overcooking turns them dry. Tent with foil the last 5 minutes if your oven runs hot.
Make-ahead tips for this chickpea chocolate brownie
Prep Ahead for Efficiency
Make the flax eggs the night before and store them in an airtight container in the fridge. This saves 10 minutes of active prep time on baking day.
The melted chocolate mixture can also be prepped up to 2 days ahead—just store it in a sealed container at room temperature and reheat gently in the microwave before mixing. I always do this when I'm short on time, and it never affects the final texture. 💡
Freezer-Friendly Baking
Bake a full pan of brownies, cool completely, then wrap each square individually in plastic wrap. Freeze them in a single layer before stacking to prevent sticking. These freeze beautifully for up to 3 months—just thaw at room temperature for 1-2 hours before serving.
The texture remains fudgy and moist, unlike many frozen desserts that turn dry. 🥶
Batch Prep for Gifting
Double the recipe and bake two pans at once (use two 9x9-inch pans instead). Once cooled, slice and package in clear cellophane bags tied with twine for stunning gifts.
The protein-packed nature makes them perfect for health-conscious friends who still crave decadence. I've sent these to coworkers during holidays, and they always disappear quickly! 🎁
Reheating for Warm Serving
For that fresh-from-oven experience, reheat individual squares in a 350°F oven for 5-7 minutes or until the edges soften slightly. Microwave reheating works too: 15-20 seconds on medium power, then let sit for 10 seconds to redistribute heat. The crackly top becomes irresistibly crisp again when warmed this way. ✨
Storage Hacks for Freshness
Store brownies in a glass airtight container with parchment paper between layers to prevent sticking. The chickpea flour helps them stay moist for 5 days at room temperature—longer than traditional brownies.
For maximum freshness, place a slice of bread in the container to absorb excess moisture. This keeps the texture perfect for up to 7 days. 🍞
Make-Ahead Swirl Variations
Pre-mix the chocolate swirl topping (chopped chocolate bars + extra chips) in a small container and refrigerate. When ready to bake, simply sprinkle and swirl directly into the batter.
I also like to pre-measure all dry ingredients in a separate container to streamline assembly. This reduces active baking time to just 15 minutes after mixing. 🌟
Nutrition facts
Frequently asked questions
Why does this recipe use chickpea flour instead of regular flour?
Chickpea flour adds a protein boost (about 15g per serving) while creating a dense, fudgy texture that traditional flour can't match. The nutty undertones also deepen the chocolate flavor, making every bite richer. Plus, it's naturally gluten-free and keeps brownies moist longer than wheat flour.
Can I make these brownies without a 9x13-inch pan?
Yes! Use a 9x9-inch pan and reduce baking time by 5-7 minutes, or divide the batter between two 8-inch round pans for individual servings. Just check for doneness at 20 minutes—the center should spring back slowly when pressed. For mini brownies, use a muffin tin with 12 minutes at 350°F.
How do I fix dry or crumbly brownies?
Overbaking is the usual culprit. Next time, pull them when the edges are set but the center still jiggles slightly. For existing dry brownies, try reheating 10 seconds in the microwave with 1 tsp almond milk—the moisture will restore that fudgy texture. If they're too crumbly, the issue might be overmixing or insufficient fat (add 1 tbsp coconut oil to the batter next time).
Are these brownies safe for nut allergies?
Only if you use nut-free chocolate chips and almond milk alternatives like oat or soy milk. The recipe itself is nut-free, but always check labels on chocolate and flour brands. For extra safety, substitute chickpea flour with gluten-free 1:1 baking flour and use certified nut-free ingredients.
What's the secret to perfect chocolate swirls?
Use room-temperature chocolate chips and work quickly when swirling—they should melt slightly into the batter but not fully dissolve. For cleaner swirls, chill the batter 10 minutes before layering, and use a spatula to gently press chips into the top layer. Avoid over-swirling, which can create gaps.