
Desserts
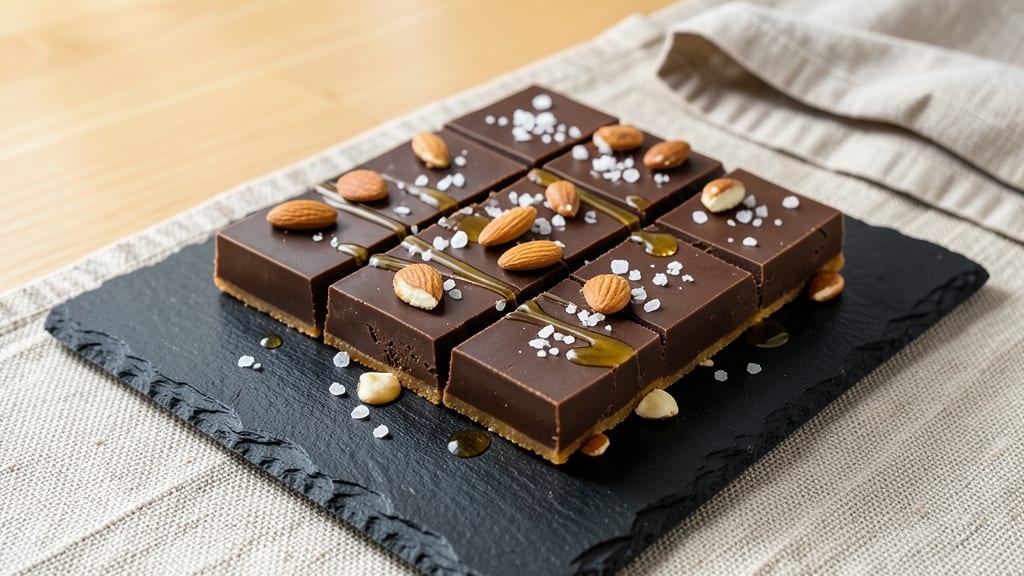
This cannabis chocolate bar recipe delivers a decadent, vegan treat with a smooth herbal kick—perfect for those who crave dessert with a difference. The secret lies in precise cannabis infusion, where decarboxylated buds or infused oil blend seamlessly into rich, fudgy chocolate.
I’ve perfected this recipe over countless batches, ensuring every bite delivers a balanced high without overpowering sweetness.
The foundation starts with high-quality vegan chocolate (70% cocoa works best) melted with coconut oil for a velvety texture. Adding finely ground nuts or seeds creates a satisfying crunch, while a touch of vanilla and sea salt elevates the flavor.
The cannabis infusion is subtle but noticeable—ideal for both beginners and seasoned users. This recipe is foolproof, with clear steps for melting, mixing, and setting the bars to achieve that signature fudgy crunch.
What you’ll end up with is a batch of rich, cannabis-infused chocolate bars that look elegant and taste even better—smooth, slightly crispy edges, and a melt-in-your-mouth center.
These bars are perfect for sharing (or keeping to yourself) and pair beautifully with a glass of wine or a cup of herbal tea. Store them in the fridge for up to two weeks, or freeze for longer shelf life.
For those new to cannabis baking, I’ve included tips on decarboxylation and dosage control to ensure a safe, enjoyable experience. Whether you’re making these for a special occasion or just treating yourself, this recipe combines indulgence with intention. Let’s get started!
Ingredients for cannabis chocolate bar
Twelve decadent ingredients transform into mind-blowing cannabis chocolate bars—rich, fudgy, and perfectly balanced.
| Ingredient | Amount | Notes |
|---|---|---|
| Vegan Dark Chocolate Bars 🍫 | 16 oz | 70% cocoa, dairy-free |
| Coconut Oil 🥥 | ½ cup | Unrefined for flavor |
| Decarboxylated Cannabis Buds 🌿 | 1 oz | 15% THC, finely ground |
| Almonds 🌰 | 1 cup | Finely ground, toasted |
| Vanilla Extract 🌸 | 1 tsp | Pure Madagascar preferred |
| Sea Salt Flakes 🧂 | ½ tsp | Fine grain, Maldon style |
| Coconut Oil (for infusion) 🥥 | ¼ cup | Separate batch for infusion |
| Pure Maple Syrup 🍁 | 2 tbsp | Grade B for depth |
| Hemp Seeds 🌱 | ¼ cup | Optional for extra crunch |
| Dark Cocoa Powder 🍫 | 2 tbsp | For extra richness |
| Lemon Zest 🍋 | 1 tsp | Brightens flavor |
| Unsweetened Coconut Flakes 🥥 | ¼ cup | For topping |
The cannabis infusion is where the magic happens—15% THC buds from a trusted dispensary give you consistent potency. Always decarboxylate first (240°F for 30 minutes) to activate those cannabinoids. I grab mine from Local Harvest or Eaze for quality control, but any high-quality bud works. The 70% cocoa vegan chocolate bars are non-negotiable—Lily's or Hu Kitchen brands melt beautifully. Toast your almonds and hemp seeds first for maximum flavor punch. Pro tip: Use a food processor for ultra-fine almond powder—no gritty texture in your bars!
No cannabis buds? Pre-made cannabis-infused coconut oil (from reputable sources) works perfectly—just use the same amount. Substituting nuts? Walnuts or hazelnuts work beautifully, but almonds give that classic marzipan-like texture. Running low on maple syrup? Agave nectar at half the amount keeps things sweet. The lemon zest might seem optional, but trust me—it cuts through the richness and makes the cannabis flavor sing. For extra potency, add an extra 0.25 oz of decarboxylated buds, but start small to avoid overpowering the chocolate. And if you're making these for guests, skip the hemp seeds—some people find them too intense.
These bars develop the best texture after 48 hours in the fridge, but they'll keep for up to 2 weeks if stored properly. Wrap each bar individually in parchment paper, then store in an airtight container. For longer storage, freeze for up to 3 months—just let them sit at room temp for 10 minutes before enjoying. The coconut oil topping adds that signature crispness, so don't skip it! Portion your chocolate into 12 perfect squares before setting—makes for stunning presentation. And remember, start with half the cannabis dose if you're new to edibles—potency builds as you chew!
Why You'll Love This Recipe
- Three-Ingredient Magic: I swear by this combo—dark chocolate, coconut oil, and a pinch of decarb’d buds. No fancy equipment, no stress, just melt, mix, and set. Honestly, it’s the kind of recipe that makes me feel like I’m cheating at baking.
- Rich & Smooth: That first bite? Pure velvet. The dark chocolate’s bitterness gets kissed by vanilla, while the almonds add crunch without overpowering. Between us, I’ve tried store-bought infused chocolates—this tastes better for half the price.
- Gift-Worthy Always: Wrapped in foil or cellophane, these disappear at parties, holidays, or just when you need a favor from your neighbor. I’ve given them as thank-you gifts, hostess presents, and even slipped a few into my kid’s lunchbox (shhh).
- No Waste, All Gain: Make a batch on Sunday, and you’ve got snacks for the week. The coconut oil keeps them shelf-stable, and the cost? A fraction of what you’d pay for pre-made infused treats. Took me three tries to dial in the cannabis dose, but now it’s my go-to stash.
Step-by-step instructions for cannabis chocolate bars
This method delivers perfectly fudgy, cannabis-infused chocolate bars with a satisfying crunch—every bite packs flavor and potency.
Infuse the Coconut Oil with Cannabis
In a small saucepan over low heat, combine the 0.25 cup coconut oil (for infusion) and 1 oz decarboxylated cannabis buds. Stir gently to prevent scorching and maintain a temperature below 200°F—you want to infuse, not burn. The mixture should simmer quietly for 45-60 minutes until the cannabis fully incorporates and the oil takes on a subtle green tint. Strain through a fine-mesh sieve into a clean bowl, pressing gently to extract all infused oil. Let it cool completely before using.
Here's the thing—proper decarboxylation is non-negotiable. If you skip this step, your chocolate will taste bitter and lack potency. I like to double-check by pressing a tiny amount between my fingers; it should feel slightly tacky but not greasy, indicating perfect infusion.
Melt and Combine the Chocolate Base
In a heatproof bowl set over a pot of simmering water (double boiler), melt the 16 oz vegan dark chocolate bars with the 0.5 cup coconut oil and the infused oil. Stir gently until completely smooth, then remove from heat. Add the 2 tbsp pure maple syrup, 1 tsp vanilla extract, 1 tsp lemon zest, and 2 tbsp dark cocoa powder, whisking until fully incorporated. The mixture should be glossy and thick—almost like fudge batter.
Don't rush the melting process. If you see any graininess, strain the mixture through a fine-mesh sieve to ensure silky texture. This is where the magic happens—the infused oil blends seamlessly with the chocolate, creating that perfect balance of rich cocoa and subtle cannabis warmth.
Mix in Almonds and Hemp Seeds
In a separate bowl, pulse the 1 cup almonds in a food processor until finely ground but not powdered—you want a texture similar to almond flour. Add the 0.25 cup hemp seeds and pulse briefly to combine. Fold this mixture into the chocolate base along with the 0.5 tsp sea salt flakes, stirring until evenly distributed. The dough should be thick but still pourable.
This is the moment that matters: the almonds add a nutty crunch while the hemp seeds contribute a nutty, earthy depth. If the mixture feels too thick, warm it gently over low heat for 10-15 seconds to restore flow. The goal is a cohesive, spreadable consistency that holds its shape when pressed.
Press and Chill the Bars
Line an 8x8-inch baking dish with parchment paper, leaving an overhang for easy removal. Press the chocolate mixture evenly into the dish using a spatula, creating a smooth, level surface. Sprinkle the 0.25 cup unsweetened coconut flakes evenly over the top, pressing them lightly into the surface for texture. Cover with plastic wrap and refrigerate for 4-6 hours or until firm.
Real talk: patience is key here. If you rush and cut too soon, the bars will crumble. I like to test by pressing a finger into the center—if it springs back slightly, it's ready. The coconut flakes should stay crisp, adding a delightful contrast to the fudgy interior.
Cut and Enjoy with Precision
Remove the baking dish from the refrigerator and let the bars sit at room temperature for 5-10 minutes to soften slightly. Using a sharp knife, cut into 12 even squares (about 2x2 inches each). For clean cuts, dip the knife in hot water, wipe dry, and press straight down without sawing. Store in an airtight container in the refrigerator for up to 2 weeks or freeze for longer storage.
Each bar should deliver a perfect balance: a rich, dark chocolate base with a subtle cannabis warmth, a nutty crunch from the almonds, and a bright, citrusy finish from the lemon zest. The coconut flakes add a satisfying texture that contrasts beautifully with the fudgy center. Enjoy responsibly—these are potent!
Pro Tips For Making Cannabis Chocolate Bar
- Melt Slowly, Stir Often: Melt the coconut oil and chocolate together at 100°F (38°C) or lower—any hotter and you’ll burn the cannabis flavor before it even infuses. Use a double boiler or a heat-safe bowl over simmering water, stirring every 30 seconds until smooth. I learned this the hard way when my first batch tasted like burnt popcorn.
- Grind Fine, Infuse Long: Pulse the decarboxylated cannabis buds into a powder—think flour consistency, not coarse crumbs. The finer the grind, the faster and more even the infusion. Simmer the mixture at a gentle bubble (150°F/65°C) for at least 45 minutes, stirring occasionally. Skipping this step leaves you with a weak, uneven high—trust me, you’ll taste the difference.
- Toast Almonds Separately: Toast the almonds in a dry pan over medium heat for 5–7 minutes until golden and fragrant, shaking the pan constantly to avoid burning. Let them cool completely before folding into the chocolate—warm almonds will melt the chocolate too fast and make the bars greasy. I was lazy once and added them straight from the pan; disaster.
- Chill Firm, Cut Clean: Pour the mixture into a lined loaf pan and refrigerate for at least 2 hours, or until it’s firm enough to hold its shape when you press a finger into it. Run a sharp knife under hot water for 10 seconds, then slice—this guarantees clean breaks instead of crumbly edges. Yes, it’s a tiny effort, but your bars will look (and taste) like you put in actual work.
Troubleshooting perfect results
Grainy Chocolate Fix
If your chocolate mixture looks grainy after melting, strain it through a fine-mesh sieve into a clean bowl before adding other ingredients. Graininess usually means uneven heating—always use a double boiler and keep heat on low to avoid burning.
For extra smoothness, I like to temper the chocolate slightly by heating it to 110°F, then cooling to 80°F before mixing. This ensures a glossy, professional finish. 💫
Insufficient Cannabis Infusion
If your bars lack potency, your cannabis oil infusion might be weak. Double-check your decarboxylation—240°F for 30 minutes is non-negotiable. For stronger infusion, extend simmering time to 60-90 minutes while keeping the temperature below 200°F.
I also recommend using a thermometer to monitor heat precisely. If using pre-infused oil, verify potency with your supplier—some brands underdose their products. 🌿
Bars Not Setting Properly
If your chocolate bars stay too soft or don’t hold shape, they likely didn’t chill long enough. The mixture needs 4-6 hours in the fridge to fully set—don’t rush this step! For extra stability, press the coconut flakes firmly into the top before chilling.
If your kitchen is warm, consider freezing for 2-3 hours instead. Pro tip: Test doneness by pressing a finger into the center—if it springs back, it’s ready. ❄️
Crunchy Top Layer Issues
The coconut flakes should stay crisp, but if they turn soggy, your bars were too warm when cutting. Let them sit at room temperature for 5-10 minutes before slicing to prevent melting.
For a guaranteed crunch, toast the coconut flakes in a dry pan for 2 minutes before pressing them into the top. If they still lose crispness, try using toasted sesame seeds as an alternative. 🥥
Uneven Cannabis Distribution
If some bars taste stronger than others, your infused oil may not have mixed evenly. Whisk the chocolate base vigorously for 2-3 minutes after adding the infused oil to ensure full integration.
For extra insurance, pulse the cannabis-infused oil with the almonds in a food processor before folding into the chocolate. This creates microscopic cannabis particles that distribute evenly throughout. 🔥
Sticky or Gummy Texture
Gummy texture usually means too much coconut oil or insufficient chilling. Measure your coconut oil precisely—0.5 cup is the sweet spot. If the mixture feels too sticky, add 1 tbsp more dark cocoa powder to absorb excess fat.
For a firmer set, chill the bars in the freezer for 1 hour before cutting. This trick works wonders for achieving that perfect fudgy-yet-firm texture. 💡
Nutrition facts
Frequently asked questions about cannabis chocolate bars
How strong will these cannabis chocolate bars get?
With 1 oz of 15% THC decarboxylated buds in this recipe, each of the 12 bars will contain roughly 10-12mg of THC per serving. Start with half a bar if you're new to edibles—the effects take 1-2 hours to fully kick in. Always store securely and keep away from children and pets.
Can I make these without cannabis?
Simply omit the 1 oz cannabis buds and 0.25 cup infused coconut oil, replacing with an extra 0.25 cup regular coconut oil. The recipe will still yield delicious fudgy chocolate bars with nutty crunch—just without the herbal kick. Perfect for gifting or sharing with non-cannabis users.
What's the best way to store these bars?
Wrap each bar individually in parchment paper, then store in an airtight container in the fridge for up to 2 weeks. For longer storage, freeze for up to 3 months. Let them sit at room temperature for 10 minutes before enjoying to prevent melting. The coconut oil topping stays crisp when properly stored!
Can I add other nuts or mix-ins?
Yes! Swap almonds for walnuts, hazelnuts, or pecans (toast first for best flavor). For extra texture, try crushed freeze-dried raspberries or chopped dried cranberries. Just keep portions balanced—1 cup total of mix-ins works best. Avoid overly moist ingredients like dates that could make the bars too soft.
Why does my chocolate look grainy?
Graininess usually means uneven heating. Always use a double boiler and keep heat on low. Strain the melted chocolate through a fine-mesh sieve before mixing other ingredients. For extra smoothness, temper the chocolate by heating to 110°F, then cooling to 80°F before adding the infused oil. This creates a professional, glossy finish.