
Beverages
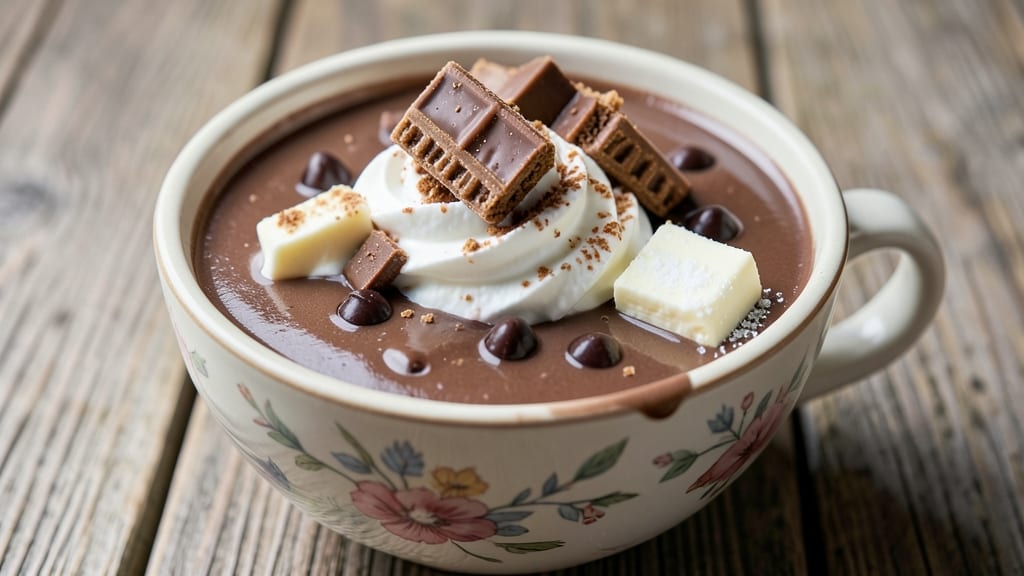
This Butterfinger hot chocolate recipe transforms a classic childhood favorite into a decadent, grown-up treat with every sip. 🔥 The secret lies in melting rich chocolate with warm milk while adding chunks of Butterfinger for a perfect balance of creamy, velvety texture and caramelized crunch.
I developed this version after years of experimenting with textures—because hot chocolate deserves to be indulgent, not just nostalgic.
The magic happens when you simmer the milk just enough to create a luxurious foam, then fold in the melted chocolate and Butterfinger pieces. The result is a drink so rich and satisfying that it feels like dessert in a mug.
This method works perfectly on the stovetop or in the microwave, giving you flexibility for any night you crave something sweet and comforting.
What you'll end up with is a hot chocolate that's thick, velvety, and packed with layers of flavor—the deep cocoa notes of the chocolate, the buttery crunch of Butterfinger, and a subtle caramel sweetness that ties it all together.
Each sip delivers that perfect contrast between smooth and crunchy, making it impossible to resist.
Perfect for chilly evenings, movie nights, or whenever you need a little extra comfort, this recipe serves two and comes together in just 10 minutes. Top with whipped cream and extra Butterfinger pieces for the ultimate indulgence. Let's get started!
Ingredients for butterfinger hot chocolate
Rich chocolate, creamy milk, and crunchy Butterfinger chunks—this decadent hot chocolate transforms a childhood classic into an indulgent adult treat.
| Ingredient | Amount | Notes |
|---|---|---|
| Butterfinger Candy Bars 🍫 | 4 whole | Chopped into 1/2-inch chunks |
| Semi-Sweet Chocolate Chips 🍫 | ½ cup | High-quality, 60% cocoa preferred |
| Heavy Whipping Cream 🥛 | 1 cup | Full-fat for best texture |
| Whole Milk 🥛 | 1 cup | Warmed for smooth blending |
| Granulated Sugar 🍚 | 2 tbsp | Or light brown sugar |
| Unsalted Butter 🧈 | 2 tbsp | Cold, cubed for easy melting |
| Vanilla Extract 🌿 | ½ tsp | Pure, high-quality preferred |
| Pinch of Salt 🧂 | ⅛ tsp | Enhances chocolate flavor |
| Whipped Cream 🥛 | ¼ cup | Store-bought or homemade |
| Extra Butterfinger Chunks 🍫 | ¼ cup | For topping, optional |
The Butterfinger bars are the star here, so grab the full-size ones—not the mini or fun-size versions. Trader Joe's and Costco often have the best bulk deals, but any grocery store will work. Chop them into even 1/2-inch pieces so they melt beautifully without turning into a gooey mess. For the chocolate, Ghirardelli or Guittard chips elevate this recipe—avoid the generic brands. The heavy cream needs to be full-fat; anything lighter will make your hot chocolate taste thin and unsatisfying. Pro tip: Warm the milk in the microwave for 45 seconds first—it blends smoother and creates that luxurious foam you crave.
No Butterfinger? Reese's or Snickers work in a pinch, but the nutty crunch is what makes this recipe special. Short on chocolate chips? Melt a chocolate bar instead—just make sure it's at least 50% cocoa for that rich flavor. The sugar can be swapped for maple syrup or brown sugar, but granulated dissolves perfectly. If you're feeling fancy, add a pinch of cinnamon to the mix—it pairs beautifully with the caramel notes. For a dairy-free version, use coconut cream and dairy-free chocolate chips, though the texture will be slightly different.
This hot chocolate tastes even better the next day, so make a double batch if you're hosting. Store leftovers in the fridge for up to 3 days, stirring before reheating. For serving, preheat your mugs in the microwave for 10 seconds—it keeps the drink hot longer. The whipped cream and extra Butterfinger chunks should go on right before drinking so they stay crisp. Freeze any extra chunks in an ice cube tray for a quick crunchy topping later.
Why You'll Love This Recipe
- Five-Minute Mix: I swear, this takes less time than waiting for the microwave to ding. Just chop the Butterfingers (or leave them whole if you're lazy), toss in the chocolate chips and milk, and let the magic happen while you're still scrolling through your phone.
- Peanut Butter Bliss: That first sip? Like drinking a warm hug from a candy bar. The Butterfingers melt into the chocolate, giving you that rich, nutty, caramelized flavor without any weird aftertaste—just pure, creamy satisfaction.
- Date Night Ready: No fancy prep, no stress—just pour and enjoy. Perfect for when you want to impress someone (or just treat yourself) without spending hours in the kitchen. Add whipped cream, and boom, instant romance.
- Budget-Friendly Luxury: You’re basically making gourmet hot chocolate for pennies. Butterfingers and chocolate chips are cheap staples, and a splash of heavy cream makes it feel like a fancy dessert. Leftovers? Even better—just reheat and repeat.
Step-by-step instructions for Butterfinger hot chocolate
Transform ordinary hot chocolate into a decadent treat with rich chocolate and nutty Butterfinger goodness.
🍳 Step 1: Melt Chocolate and Butter Together
In a medium saucepan, combine the 0.5 cup semi-sweet chocolate chips and 2 tbsp unsalted butter. Place over medium-low heat and stir gently until both ingredients melt completely. You'll know it's ready when the mixture becomes smooth and glossy—about 3-4 minutes. This low heat prevents burning while ensuring even melting.
Here's the thing—I like to use a silicone spatula for this step because it helps scrape up all those delicious chocolate bits from the bottom of the pan. Once fully melted, remove from heat immediately to prevent overheating. The chocolate should be silky and ready for the next step. If you see any unmelted bits, stir gently and return to heat for another 10-15 seconds—just enough to finish the job.
🥘 Step 2: Warm Milk and Cream
In the same saucepan (no need to wash it—those chocolate bits add flavor!), add the 1 cup whole milk and 1 cup heavy whipping cream. Heat over medium heat until the mixture reaches 160°F—just below a simmer. You'll see tiny bubbles forming around the edges, but it shouldn't be boiling vigorously.
While heating, whisk in the 2 tbsp granulated sugar, 0.5 tsp vanilla extract, and 0.125 tsp pinch of salt. Stir constantly to dissolve the sugar completely and infuse the flavors. The salt might seem like a tiny amount, but it enhances the chocolate flavor dramatically. Taste the mixture—it should be sweet enough to balance the rich chocolate but not cloyingly so.
🍫 Step 3: Combine Chocolate and Milk Mixtures
Slowly pour the melted chocolate mixture into the warm milk and cream while whisking continuously. This gradual addition prevents the chocolate from seizing up. You'll notice the mixture thicken slightly as the chocolate incorporates—this is normal and creates that luxurious hot chocolate texture.
Return the saucepan to low heat and stir for 2-3 minutes until everything is fully combined and smooth. The heat helps the flavors meld beautifully. Here's where it gets magical: add 3 of the chopped Butterfinger candy bars (about 3/4 of the total 4 whole bars) and let them steep in the warm mixture for 1-2 minutes. This infuses the hot chocolate with that signature Butterfinger crunch and peanut flavor without making it too thick.
👨🍳 Step 4: Prepare the Butterfinger Topping
While the hot chocolate simmers, whip the 0.25 cup whipped cream to soft peaks in a separate bowl. Fold in the remaining 1 chopped Butterfinger candy bar (about 1/4 of the total) and 0.25 cup extra Butterfinger chunks until evenly distributed. This creates a dreamy, crunchy topping that contrasts perfectly with the smooth hot chocolate.
For the best texture, I like to use a hand mixer on medium speed for 30-45 seconds until the whipped cream holds its shape but still has a slight give. The Butterfinger pieces should be distributed throughout—some visible for crunch, but not clumped together. Keep this mixture chilled until ready to serve to maintain its fluffy texture.
🍽️ Step 5: Serve with Style
Ladle the hot chocolate into two mugs, dividing the Butterfinger-infused mixture evenly. Top each serving generously with the whipped cream mixture, creating a beautiful contrast of colors and textures. The warm chocolate against the cool, creamy topping is pure indulgence.
Here's my pro tip: sprinkle with a pinch of sea salt on top to enhance the flavors even more. Serve immediately while the hot chocolate is steaming and the whipped cream is at its peak texture. Each sip delivers a perfect balance of rich chocolate, nutty Butterfinger crunch, and velvety creaminess that'll have everyone asking for seconds.
Pro Tips For Making Butterfinger Hot Chocolate
- Chop the Butterfingers Small: I learned this the hard way—big chunks of Butterfinger sink to the bottom like rocks and refuse to melt evenly. Roughly chop them into ¼-inch pieces first, so every sip gets that peanut-buttery richness.
- Heat the Milk Slowly: Pouring cold milk into hot chocolate? That’s a recipe for clumpy disaster. Warm the milk to 160°F first—just until tiny bubbles form at the edges—so it blends smoothly without scrambling the chocolate.
- Whip the Cream Last: The heavy cream’s job is to top, not to cook. Whip it to soft peaks right before serving, then spoon it on top like a fluffy crown. If you heat it, you’ll end up with buttery pudding instead of silky clouds.
- Use Double the Chocolate: Skip the sugar shortcut—melt both the Butterfinger bars and the semi-sweet chips together. The extra cocoa deepens the flavor without needing extra sweetness. Trust me, your taste buds will notice.
Make-ahead tips for leftovers
Batch Prep Strategy
Make a double batch (4 servings) when you have guests—it reheats beautifully. Store leftover hot chocolate in an airtight glass jar in the fridge for up to 3 days.
The flavors actually deepen overnight, making it taste even richer the next day. Just stir vigorously before reheating to restore that velvety texture. 💫
Freezer-Friendly Hack
Freeze the Butterfinger chunks in ice cube trays for quick toppings later. Pop them out and store in a ziplock bag—they’ll keep their crunch perfectly for 2 months.
When reheating your hot chocolate, simply add 1-2 frozen chunks to each mug for instant crunch without thawing. This trick saves time and keeps your toppings fresh.
Microwave Shortcut
For a 5-minute version, melt the chocolate and butter in a microwave-safe bowl in 30-second bursts, stirring between each. Heat the milk and cream in a separate mug for 1 minute 30 seconds (stir halfway) until warm.
Combine in a blender for 10 seconds to create that signature smooth texture. The Butterfinger chunks should be added last—just let them steep for 30 seconds before serving.
Gift-Worthy Jars
Package individual servings in small mason jars with a Butterfinger chunk on top for a thoughtful gift. Store them in the fridge and include reheating instructions: "Microwave for 1 minute 30 seconds, stir, then top with whipped cream."
I’ve given these as holiday gifts—they’re always a hit! Label with the date and "Best by 3 days" to ensure freshness. ✨
Reheating Perfection
Reheat in 10-second increments in the microwave, stirring between each, until steaming hot. For stovetop, warm over low heat with 1 tbsp milk to prevent scorching.
Always add fresh whipped cream and Butterfinger chunks after reheating to preserve their texture. A sprinkle of sea salt on top finishes the flavor beautifully.
Make-Ahead Toppings
Prep the whipped cream topping in advance and store it in the fridge for up to 2 days. Keep the Butterfinger chunks separate until serving to maintain their crunch. When ready to serve, simply whip the cream again for 10 seconds to restore volume, then fold in the chunks.
This saves 5 minutes of prep time when you're ready to serve.
Nutrition facts
Frequently asked questions
Can I make this Butterfinger hot chocolate without dairy?
Swap the whole milk and heavy cream for coconut milk or oat cream, and use dairy-free chocolate chips. For the whipped cream topping, try coconut whipped cream or aquafaba (chickpea brine) whipped with a pinch of xanthan gum. The texture will be different but still delicious.
How do I prevent the Butterfinger pieces from sinking to the bottom?
Add the chopped Butterfinger pieces just before serving or use them as a topping. If you must infuse them into the drink, let them steep for only 1-2 minutes on low heat, then remove with a slotted spoon before serving. For extra crunch, freeze the chunks in ice cube trays and add 1-2 cubes to each mug after reheating.
What's the best way to store leftovers?
Store in an airtight glass jar in the fridge for up to 3 days. Stir well before reheating in 10-second microwave bursts with 1 tbsp milk to restore smoothness. Always add fresh whipped cream and Butterfinger chunks after reheating to keep their texture perfect. The flavors actually improve overnight!
Can I make this in a slow cooker or Instant Pot?
Yes! For the slow cooker, combine all ingredients except the whipped cream topping on low heat for 1-2 hours, stirring occasionally. In an Instant Pot, use the "Sauté" function to melt the chocolate, then add the milk mixture and cook on low heat for 5 minutes. Both methods work well—just keep an eye on the temperature to avoid overheating.
Why did my hot chocolate turn grainy?
This usually happens from overheating or using low-quality chocolate. Always melt chocolate on low heat and remove it from heat immediately after melting. For the best results, use high-quality chocolate chips (like Ghirardelli) and avoid boiling the milk mixture. If it happens, whisk vigorously or blend briefly to restore smoothness.