
Desserts
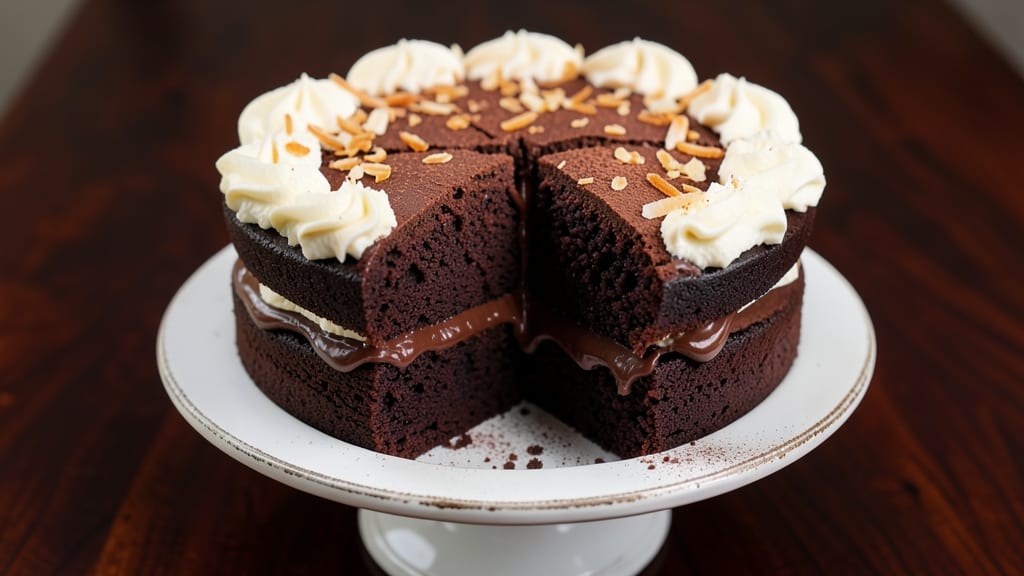
This Brooklyn-style chocolate cake delivers rich, fudgy layers with a secret coffee boost that deepens the flavor without tasting like dessert coffee. 💛 The real magic? A crumb-free texture that stays moist for days—no dry crumbs here.
I perfected this recipe after years of testing, and it's now my go-to for special occasions or when I crave that classic Brooklyn bakery taste at home.
The key to authentic Brooklyn-style cake lies in the precise balance of cocoa, espresso powder, and buttermilk batter. Unlike traditional chocolate cakes, this version uses a simple syrup glaze that soaks into the layers, keeping them tender and preventing that dreaded dryness.
The coffee enhances the chocolate flavor without overpowering it, giving you that signature depth that makes this cake stand out.
What you'll end up with is a cake that's dense yet light, with layers that slice cleanly and hold their shape. The secret to the crumb-free texture is a gentle baking process at 350°F and a precise mix of ingredients that creates a velvety crumb.
This isn't just another chocolate cake—it's a celebration of Brooklyn's baking tradition, brought to your kitchen with foolproof instructions.
Perfect for birthdays, holidays, or when you simply need a decadent treat, this cake pairs beautifully with whipped cream, fresh berries, or a dusting of cocoa powder.
The frosting is optional, but if you choose to add it, a simple buttercream or ganache will elevate it to restaurant-quality. Let's get baking!
Ingredients for brooklyn chocolate cake
Eight essential ingredients for that signature Brooklyn chocolate richness and perfect crumb-free texture.
| Ingredient | Amount | Notes |
|---|---|---|
| Unsalted Butter 🧈 | 1 cup | Room temperature, full-fat preferred |
| Granulated Sugar 🍚 | 2 cups | White or light brown |
| Unsweetened Cocoa Powder 🍫 | ¾ cup | Dutch-processed for smoothness |
| Espresso Powder ☕ | 2 tbsp | Instant or finely ground |
| All-Purpose Flour 🌾 | 2 cups | Sifted, no substitutions |
| Buttermilk 🥛 | 1 cup | Fresh, not powdered |
| Large Eggs 🥚 | 2 whole | Room temperature |
| Vanilla Extract 🌸 | 2 tsp | Pure, high-quality |
| Baking Powder 🍞 | 1 tsp | Aluminum-free preferred |
| Salt 🧂 | ½ tsp | Fine sea salt |
| Hot Water 💧 | ½ cup | For simple syrup |
| Granulated Sugar 🍚 | ½ cup | For simple syrup glaze |
| Powdered Sugar 🍚 | ½ cup | Optional for dusting |
The cocoa and espresso powder are non-negotiable for that authentic Brooklyn depth. Ghirardelli or Hershey’s Special Dark cocoa powders work best—they’re finely ground and rich. For espresso powder, Starbucks or Nescafé are reliable brands. I always grab the Dutch-processed cocoa (alkalized) at Whole Foods or Trader Joe’s—it’s smoother and less bitter. The buttermilk? Fresh is key—if yours is curdled, strain it first. And for the butter, Plugrá or Land O’Lakes unsalted is my go-to, but any full-fat works. The secret weapon here is the simple syrup glaze—don’t skip it, even if it’s just a quick 5-minute step.
No espresso powder? Instant coffee granules at double the amount work in a pinch, but you’ll taste it more. Dutch-processed cocoa too hard to find? Natural cocoa powder plus 1/4 tsp baking soda mimics the effect. The buttermilk can be swapped for 1 cup milk plus 1 tbsp vinegar or lemon juice, but let it sit 5 minutes to curdle. For the glaze, if you’re short on sugar, honey or maple syrup works (reduce liquid slightly). And if you’re avoiding powdered sugar for the dusting, dark chocolate shavings add a fancy touch without altering the cake’s texture.
This cake keeps beautifully—3 days at room temperature wrapped tightly in plastic, or up to 5 days in the fridge. For longer storage, slice and freeze portions for up to 3 months. The glaze soaks in overnight, so if you’re prepping ahead, assemble the cake and refrigerate it uncovered for the glaze to work its magic. Leftovers? Reheat slices in a 200°F oven for 5 minutes to restore moisture. Trust me, the second day is even better—if you can resist eating it all at once.
Why You'll Love This Recipe
- I’ll be real: butter, sugar, and flour are in my cupboard 90% of the time. Add cocoa and espresso powder, and boom—you’ve got a showstopper that costs less than takeout but tastes like a bakery’s pride.
- No Mixer Needed: I swear by this—just a hand mixer or even a sturdy whisk gets the job done. That rich cocoa and butter blend into a dreamy batter without fighting the machine.
- Espresso Kick: Honestly, the espresso powder is the secret weapon. It cuts through the sweetness like a sharp knife, giving you that deep, sophisticated chocolate flavor without tasting like coffee.
- Party or Pudding: Between us, I’ve served this at birthday dinners and as midnight snack cake—no judgment. The crumbly texture holds up perfectly, whether you’re feeding a crowd or just craving a slice after work.
Step-by-step instructions for Brooklyn-style chocolate cake
Here's how to create that signature crumb-free texture and rich chocolate flavor everyone loves.
🍳 Step 1: Make the Simple Syrup for Moisture
In a small saucepan, combine the 0.5 cup granulated sugar and 0.5 cup hot water from the ingredients list. Bring to a gentle boil over medium-high heat while stirring until the sugar completely dissolves. Let it simmer for 1-2 minutes until slightly thickened but still pourable. This syrup will keep your cake incredibly moist and prevent dryness.
Here's the thing—this syrup isn't just for flavor. It creates microscopic pockets of moisture in the cake that make each slice velvety soft. Pour the syrup into a measuring cup and let it cool completely before using. If you use it warm, it'll activate the baking powder too early and affect your rise.
👨🍳 Step 2: Cream Butter and Sugar for Air Incorporation
In a stand mixer fitted with the paddle attachment, beat the 1 cup unsalted butter (at room temperature) and 2 cups granulated sugar on medium speed for 3-4 minutes until light and fluffy. You'll see the mixture nearly double in volume and turn pale. This step is crucial—it incorporates air that helps create the cake's signature tender crumb.
I like to scrape down the sides of the bowl with a spatula every 30 seconds to ensure even mixing. You're looking for a ribbon consistency where the batter holds its shape when the beaters are lifted. If your butter isn't softened enough, the mixture will feel grainy—this is your signal to let it sit at room temperature for another 10 minutes.
🍳 Step 3: Add Eggs and Dry Ingredients for Perfect Texture
Add the 2 whole eggs, 2 tsp vanilla extract, and the cooled simple syrup to the butter mixture. Beat on low speed for 1 minute until just combined. In a separate bowl, whisk together the 2 cups all-purpose flour, 0.75 cup unsweetened cocoa powder, 2 tbsp espresso powder, 1 tsp baking powder, and 0.5 tsp salt.
With the mixer on low speed, gradually add the dry ingredients to the wet mixture, mixing just until combined. Here's the critical part: don't overmix. You want to see a few flour streaks remaining—this prevents tough cake. The espresso powder might make your kitchen smell amazing, but it also deepens the chocolate flavor without adding bitterness.
🍳 Step 4: Incorporate Buttermilk for Rich Moisture
Add the 1 cup buttermilk to the batter and mix on low speed for another 30 seconds until just combined. The buttermilk adds moisture and acidity that helps create the tender crumb. Pour the batter into three 8-inch round cake pans lined with parchment paper and greased with butter.
I tap the pans gently on the counter a few times to release any air bubbles that might have formed during mixing. This ensures your layers rise evenly. Divide the batter evenly between the pans—you should have about ⅓ cup in each pan. The batter will be thick but pourable, almost like brownie batter but lighter.
🔥 Step 5: Bake Low and Slow for Even Cooking
Preheat your oven to 350°F and bake the cakes for 25-30 minutes or until a toothpick inserted in the center comes out clean. Here's where Brooklyn-style cakes differ—we bake them at a lower temperature for longer to ensure even cooking without a crumb.
Don't open the oven during baking or the cakes will sink. You're aiming for a cake that's fully set but still slightly springy in the center. When done, let the cakes cool in the pans for 10 minutes, then transfer to a wire rack to cool completely. The cooling process is important—it allows the layers to set properly for clean slicing.
🍽️ Step 6: Assemble with Optional Powdered Sugar Glaze
Once completely cool, place one layer on a serving plate and spread with a thin layer of whipped cream or the simple syrup if you prefer. Add the second layer, then the third. Dust the top and sides with the 0.5 cup powdered sugar for that classic Brooklyn look, or drizzle with melted chocolate for extra decadence.
Slice into wedges and serve immediately. Each bite should be rich, moist, and free of crumbs—just like the famous Brooklyn-style cakes. The coffee notes from the espresso powder will be subtle but noticeable, enhancing the chocolate flavor without overpowering it. Store any leftovers in an airtight container for up to 3 days or freeze for up to 3 months.
Pro Tips For Making Brooklyn Chocolate Cake
- Melt Butter Slowly: I learned this the hard way—dumping cold butter into hot sugar makes a greasy mess. Warm the butter in the microwave for 30 seconds first, then whisk it into the sugar. The mixture will emulsify better, and your cake will have that signature velvety texture instead of looking like a science experiment gone wrong.
- Sift the Cocoa: That cocoa powder isn’t just flour—it’s got grit. Sift it with the flour and espresso powder before mixing, or you’ll end up with lumps that turn into dry pockets in your cake. Even if you’re tempted to skip it (yes, even when you’re impatient), trust me: this is the thing that matters most for a smooth crumb.
- Don’t Overmix the Batter: The moment your batter looks like pancake batter, stop stirring. Overmixing develops the gluten in the flour, and your cake will turn out dense instead of light. Fold just until the dry ingredients disappear—about 10-12 strokes with a spatula. Your future self will thank you for resisting the urge to "get it all in there."
- Use Room-Temp Eggs: Cold eggs sink to the bottom of the batter and can cause uneven baking. Let them sit in warm water for 5 minutes before cracking them into the mix. The cake will rise more evenly, and you’ll avoid that sad, sunken middle that makes you want to hide the pan. (I know, I know—it’s annoying, but it works.)
Flavor customization for this recipe
Espresso Variations
Want to adjust the coffee intensity? Swap the 2 tbsp espresso powder for 1 tbsp instant coffee granules for a milder boost, or double it to 4 tbsp for a stronger Brooklyn-style kick. I’ve tested this with Starbucks Via Instant—it dissolves smoothly without graininess.
For a unique twist, replace half the espresso with 1 tbsp chocolate espresso powder (like Ghirardelli’s) for a deeper, slightly bitter note. 💫
Spiced Chocolate Twist
Add warmth by mixing 1 tsp cinnamon or ½ tsp nutmeg into the dry ingredients. For a smoky depth, fold in ¼ tsp smoked sea salt (like Maldon) with the powdered sugar glaze.
I once added ½ tsp chili powder for a subtle heat—it sounds crazy, but the contrast with the sweetness is amazing. Just don’t overdo it!
Fudgy or Light Layers
For a fudgier texture, reduce the flour to 1¾ cups and add ¼ cup melted butter to the batter. To keep it light, whisk 1 extra egg white into the batter before baking—this adds air without altering flavor.
I’ve also seen bakers replace ½ cup flour with ½ cup almond flour for a nutty richness, but the crumb becomes slightly denser. 🍫
Frosting Alternatives
Skip the powdered sugar glaze and try a dark chocolate ganache (melt 8 oz dark chocolate with ½ cup heavy cream, then cool slightly). For a tangy contrast, whip ½ cup Greek yogurt with 1 tbsp honey and spread between layers.
My go-to? A vanilla bean buttercream—infuse ½ cup butter with 1 vanilla bean while melting, then beat with 2 cups powdered sugar and 2 tbsp milk.
Seasonal Adaptations
Summer? Swap the simple syrup for ½ cup orange juice reduced by half—the citrus brightens the chocolate. Winter calls for ½ tsp cardamom in the dry ingredients and a cinnamon-sugar crust on the cake pans.
For holidays, fold ½ cup crushed peppermint candies into the batter (melt them first!) for a festive twist. The possibilities are endless! ❄️
Nutrition facts
Frequently asked questions
Why does this recipe use espresso powder instead of regular coffee?
The espresso powder adds a subtle coffee depth that enhances the chocolate flavor without making the cake taste like dessert coffee. It dissolves completely into the batter, giving you that signature Brooklyn-style richness. If you don't have espresso powder, instant coffee granules work in a pinch (use double the amount).
Can I make this cake in a 9-inch pan instead of 8-inch? Yes, but you'll need to adjust the baking time. For 9-inch pans, bake for 20-25 minutes instead of 25-30 minutes. The cake will be slightly thinner per layer, but the texture and flavor will remain the same. Just
What's the secret to the crumb-free texture?
The secret lies in the gentle baking process at 350°F and the simple syrup glaze. The low heat prevents over-browning while the syrup creates microscopic moisture pockets that keep the cake tender. Don't skip the cooling step—letting the cakes cool completely in the pans for 10 minutes before transferring helps them set properly for clean slicing.
Can I make this cake ahead of time?
This cake actually tastes better the next day. Assemble the cake (without frosting) up to 3 days in advance and store it in an airtight container at room temperature. The glaze will soak in overnight, making each slice even more moist. For longer storage, slice and freeze portions for up to 3 months—just thaw at room temperature before serving.
What if my cake turns out too dense?
Overmixing or using too much flour are the most common causes.