
Desserts
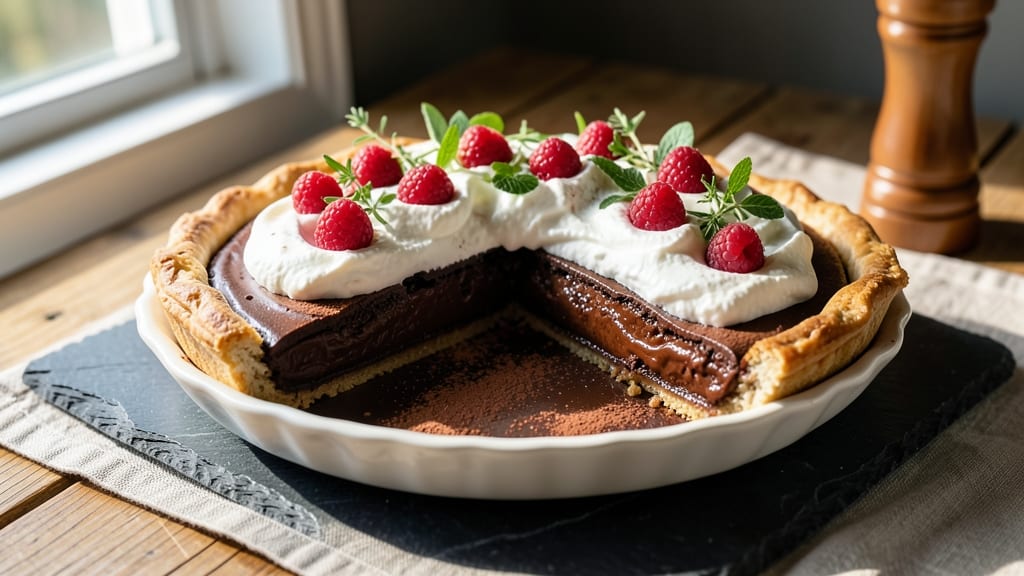
This bittersweet chocolate pie delivers a perfect balance of rich cocoa depth and velvety vanilla cream that’ll satisfy any chocolate lover. 💛 The secret lies in using high-quality bittersweet chocolate (70% cocoa or higher) and a simple yet foolproof custard base that creates those signature deep cracks when cooled.
I’ve perfected this recipe over years of baking, ensuring every slice delivers a harmonious blend of textures—crisp crust, creamy filling, and that irresistible crack that signals perfection.
The recipe begins with a classic all-butter pie crust that forms a sturdy yet flaky foundation, then transforms into a luxurious chocolate custard filling infused with vanilla bean.
The combination of melted chocolate, eggs, sugar, and heavy cream creates a smooth, velvety texture that sets beautifully with just the right amount of firmness. Baking at 350°F for 45-50 minutes ensures a golden crust while keeping the center gently set, not runny.
What makes this pie truly special is how the flavors develop as it cools—those deep cocoa cracks form naturally, creating pockets of intensified chocolate flavor. Served warm with a dollop of whipped cream or a sprinkle of cocoa powder, each bite delivers a symphony of textures and tastes.
The crust remains crisp, the custard stays rich and creamy, and the vanilla infusion adds a subtle sweetness that balances the bitterness perfectly.
Perfect for holidays, special occasions, or when you simply crave a decadent dessert that’s easier to make than you’d expect. The recipe scales beautifully, so you can make it for a crowd or just enjoy a single slice when the craving strikes. Let’s get baking!
Ingredients for bittersweet chocolate pie
Pantry staples plus two key ingredients: high-quality bittersweet chocolate and vanilla bean.
| Ingredient | Amount | Notes |
|---|---|---|
| All-Purpose Flour 🌾 | 2 ½ cups | Sifted for smooth crust |
| Unsalted Butter 🧈 | 1 cup | Cold, cubed for flaky layers |
| Granulated Sugar 🍚 | ¼ cup | For crust sweetness |
| Large Eggs 🥚 | 1 whole | Room temperature preferred |
| Ice Water 💧 | ½ cup | For pie dough binding |
| Bittersweet Chocolate 🍫 | 12 oz | 70% cocoa or higher |
| Heavy Cream 🥛 | 2 cups | Full-fat for richness |
| Granulated Sugar 🍚 | ¾ cup | For custard sweetness |
| Large Egg Yolks 🥚 | 4 whole | Separated from whites |
| Vanilla Extract 🍯 | 2 tsp | Pure vanilla preferred |
| Vanilla Bean 🌿 | 1 whole | Seeds scraped for infusion |
| Salt 🧂 | ½ tsp | Fine sea salt preferred |
| Unsweetened Cocoa Powder 🍫 | ¼ cup | For dusting top crust |
| Heavy Whipping Cream 🥛 | 1 cup | For optional whipped topping |
The chocolate makes or breaks this pie. Ghirardelli or Valrhona are my go-tos—they melt smoothly and have that deep, complex flavor. If you're using bars, chop them into even pieces for consistent melting. For the vanilla, Madagascar bourbon or Tahitian beans add layers of flavor, but any quality bean works. The heavy cream should be cold when you measure it—straight from the fridge gives the best whipped texture later. Butter matters too: use European-style butter if you can find it, but regular unsalted works fine. Store all dry ingredients in airtight containers to keep them fresh longer.
No bittersweet chocolate? Dark chocolate with 70% cocoa is your best bet—avoid milk chocolate or anything under 60%. Running short on vanilla bean? Pure vanilla extract works at double the amount, but you'll miss those little specks of flavor. The pie crust can be made ahead and frozen—just thaw before rolling. For the custard, if you don't have egg yolks, you can use 4 whole eggs, but the texture will be slightly less rich. The cocoa powder on top is optional but adds that professional touch—Dutch-processed cocoa gives a smoother finish than natural cocoa.
This pie tastes even better the next day once those signature cracks form. Store leftovers covered at room temperature for 2 days, or refrigerate for up to 5 days. The crust stays crisp if you reheat slices in the oven for 5-10 minutes at 350°F. For serving, I always whip the heavy cream with a pinch of cocoa powder—add it to the whipped cream at the very end so it doesn't deflate. Freeze portions for up to 3 months if you're making it ahead for a party.
Why You'll Love This Recipe
- No-Fuss Crust: I swear by this butter-and-flour crust—just mix, press, chill. No rolling pins, no stress. The eggs and ice water bind it perfectly, so it holds shape even when you’re in a hurry (or, let’s be real, when you’re watching the game and forget to set a timer).
- Rich Without the Guilt: That bittersweet chocolate? It’s the star. Deep, complex, and just sweet enough to satisfy your craving without leaving you in a sugar coma. The granulated sugar in the crust adds a subtle caramel note—trust me, it’s the little details that make this pie ridiculously good.
- Weeknight Hero: This pie is my go-to for when I need dessert but don’t want to spend hours baking. It’s ready in under an hour, and the leftovers? They’re even better the next day—cold or warmed, it’s always a hit. Honestly, I’ve served it at dinner parties, potlucks, and lazy Sundays, and no one’s ever asked for seconds just once.
- Budget-Friendly Luxury: You’d think a pie this good would break the bank, but it doesn’t. Butter, flour, sugar, eggs—these are pantry staples. I’ve made this for under $10, and it still tastes like a fancy bakery slice. Plus, the crust uses every bit of the dough, so no wasted scraps. That’s what I call smart baking.
Step-by-step instructions for bittersweet chocolate pie
Here's how to build a pie with a buttery crust, rich chocolate filling, and that perfect crackly top.
👨🍳 Step 1: Make the Crust with Cold Butter
In a large bowl, combine the 2.5 cups all-purpose flour and 0.25 cup granulated sugar. Cut in the 1 cup cold unsalted butter using a pastry cutter or your fingers until the mixture resembles coarse crumbs with pea-sized butter pieces. This is crucial—cold butter creates flaky layers.
Add the 1 whole large egg and 0.5 cup ice water, mixing just until the dough comes together. Don't overwork it. Divide the dough into two equal discs, wrap in plastic, and chill for at least 1 hour (or up to 24 hours). This resting time relaxes the gluten for a tender crust.
🍳 Step 2: Prepare the Chocolate Filling
Preheat your oven to 350°F. Roll out one dough disc between two sheets of parchment paper to fit a 9-inch pie dish, leaving a 1-inch overhang. Transfer to the dish and trim the edges. Crimp decoratively and chill while you make the filling.
In a double boiler, melt the 12 oz bittersweet chocolate with the 2 cups heavy cream over simmering water, stirring until smooth. In a separate bowl, whisk the 4 whole large egg yolks, 0.75 cup granulated sugar, 2 tsp vanilla extract, seeds from the 1 whole vanilla bean, and 0.5 tsp salt until pale. Slowly temper the chocolate mixture into the yolks while whisking constantly.
🥘 Step 3: Assemble and Bake the Pie
Pour the chocolate mixture into the chilled pie crust. Roll out the second dough disc and cut it into 1-inch strips for a lattice top. Arrange the strips in a crisscross pattern, leaving the center open. Dust the top with 0.25 cup unsweetened cocoa powder for that classic chocolate pie look.
Bake for 45-50 minutes until the filling is set but still slightly jiggly in the center (it'll firm up as it cools). The edges should be golden brown and the lattice should be crisp. Let cool completely before slicing—this prevents a runny filling.
🍽️ Step 4: Add the Whipped Topping (Optional)
While the pie cools, whip the 1 cup heavy whipping cream with a hand mixer until soft peaks form. Spread this over the cooled pie just before serving. The contrast of warm pie with cool whipped cream makes every bite perfect.
Slice into wedges and serve immediately. The crust should be crisp, the filling rich and fudgy, and the whipped cream light and airy. Store leftovers covered in the fridge for up to 3 days—though I doubt any will last that long!
Pro Tips For Making Bittersweet Chocolate Pie
- CHILL YOUR MIXED BUTTER: After creaming butter and sugar, pop the bowl in the fridge for 10-15 minutes if your kitchen feels like a sauna. I learned this the hard way—my crusts used to turn greasy because the butter melted too fast during baking. Cold butter = flaky layers that hold up to the chocolate filling’s weight.
- WEIGH YOUR FLOUR: Scoop that flour with a scale instead of your measuring cups. Packing flour compresses it, and you’ll end up with a crust that’s dense as a brick. Spoon flour into the cup, level it off—no tapping—and you’ll get the light, crisp texture this pie deserves.
- DON’T OVERMIX THE CRUST: Once you add ice water, stop stirring the second the dough clumps together. Overworking it develops gluten, and your crust will turn tough instead of tender. Two or three gentle folds are all it takes—then shape it fast and let it rest.
- BAKE THE CRUST BLIND: Weigh down that crust with pie weights or dried beans before adding the filling. Without support, the bottom will puff up like a sad balloon when it hits the oven. Pre-bake it until the edges are just golden—about 15 minutes at 375°F—and you’ll avoid a soggy bottom when the chocolate goes in.
Wine and beer pairings for this recipe
Red Wine Pairings
For this bittersweet chocolate pie, I reach for a bold red wine that mirrors the deep cocoa flavors while cutting through the richness. A Cabernet Sauvignon from Napa Valley—like Louis M. Martini Cabernet—works beautifully with its dark fruit notes and tannins that complement the chocolate.
The acidity helps cleanse your palate between bites, making each slice taste even more decadent. 🍷
If you prefer something smoother, try a Pinot Noir from Oregon—its lighter body and red fruit flavors won’t overpower the pie’s complexity. I love pairing it with Domaine Serene Pinot Noir, which has just enough earthiness to enhance the chocolate’s depth without competing.
Serve slightly chilled (55-60°F) to let the wine’s bright acidity shine.
Port Wine Finishing
For a dessert-focused pairing, drizzle a spoonful of tawny Port over each slice before serving. The nutty, caramelized notes of a 10-year-old tawny Port (like Graham’s Six Grapes) harmonize perfectly with the pie’s bittersweet balance.
The alcohol content also helps cut through the richness, making every bite feel lighter. 🥂
Beer Pairings
Craft beer lovers shouldn’t miss out—opt for a stout with chocolatey undertones. A Guinness or Founders Kentucky Breakfast Stout brings malty, roasted notes that echo the pie’s cocoa depth.
The creamy texture of the beer also contrasts nicely with the pie’s crisp crust. Serve slightly chilled (45-50°F) to balance the dessert’s warmth.
For a lighter option, try a Belgian-style dubbel like Westmalle Dubbel. Its caramel and raisin flavors complement the vanilla in the pie while the alcohol content helps cleanse your palate. The pie’s bitterness pairs surprisingly well with the beer’s subtle sweetness, creating a delightful contrast. 🍺
Coffee Pairing
If you’re serving this pie after dinner, a dark roast coffee with chocolate notes is a must. I recommend a Sumatra Mandheling or Ethiopian Yirgacheffe—both have deep, earthy flavors that enhance the pie’s cocoa richness.
The natural acidity in the coffee helps balance the sweetness, while the bitterness in both the pie and coffee creates a satisfying harmony. 💫
Nutrition facts
Frequently asked questions
Why does my bittersweet chocolate pie have a runny filling?
Underbaking is usually the culprit! The filling should be set but still slightly jiggly in the center when done (45-50 minutes at 350°F). If it's runny, it needs more time in the oven. For next time, let the pie cool completely before slicing—this helps the custard firm up properly. Also, ensure your chocolate is fully melted and tempered into the egg mixture to prevent separation.
Can I substitute milk chocolate for bittersweet?
Not recommended—milk chocolate lacks the depth of flavor and richness that bittersweet provides. For a similar effect, use dark chocolate with 70% cocoa or higher, but expect a more intense bitterness. If you must use milk chocolate, reduce the sugar in the filling by 2 tablespoons to balance the sweetness. The pie's signature bittersweet flavor comes from the chocolate's cocoa content, so stick with bittersweet for the best results.
How do I make the crust extra crispy?
Start with very cold butter and handle the dough as little as possible to avoid developing gluten. Brush the baked crust with a light layer of egg wash before adding the filling, then bake for 10 minutes at 350°F before adding the chocolate mixture. This pre-baking step creates a sturdy base. For extra crunch, sprinkle a thin layer of powdered sugar on the crust before baking—it caramelizes into a sweet, crisp topping.
Why do some chocolate pies have cracks, while others don't?
Those signature cracks form when the custard cools slowly and contracts—it's a sign of a perfectly balanced filling! The cracks appear because the chocolate custard has just the right amount of fat and sugar to create tension as it sets. To encourage them, let the pie cool at room temperature for 2 hours before refrigerating. If your pie doesn't crack, it might be too sweet or lack sufficient cocoa content—try increasing the bittersweet chocolate by 1 ounce next time.
Can I make this pie ahead of time?
This pie tastes even better the next day as the flavors meld. Assemble the pie (without the whipped cream topping) and refrigerate it for up to 24 hours before baking. For longer storage, bake the pie and store it at room temperature for 2 days or refrigerate for 5 days. The crust stays crisp if you reheat slices in the oven for 5-10 minutes at 350°F before serving. Freeze baked portions for up to 3 months—just thaw overnight in the fridge.